
Custom Printed Paper Bag Artwork: 8 Checks Before You Go to Production
File format requirements, 3mm bleed specifications, Pantone vs CMYK colour matching, proofing process, and common artwork mistakes that delay production for UK custom paper bags.
Filed under Operations.
A custom printed paper bag is often the first physical touchpoint a customer has with your brand — it leaves your counter, travels through the high street, and sits on a kitchen worktop where it is visible to everyone in the household. Getting the artwork right before production is not a creative exercise; it is a specification process that determines whether your bags arrive on time, within budget, and looking exactly as intended. UK foodservice operators lose an average of 5-10 working days per order to artwork revisions, according to packaging industry estimates, and each revision cycle adds cost and delays delivery. The following eight checks, completed before you submit your artwork, will eliminate the most common rejection reasons and keep your order on schedule.
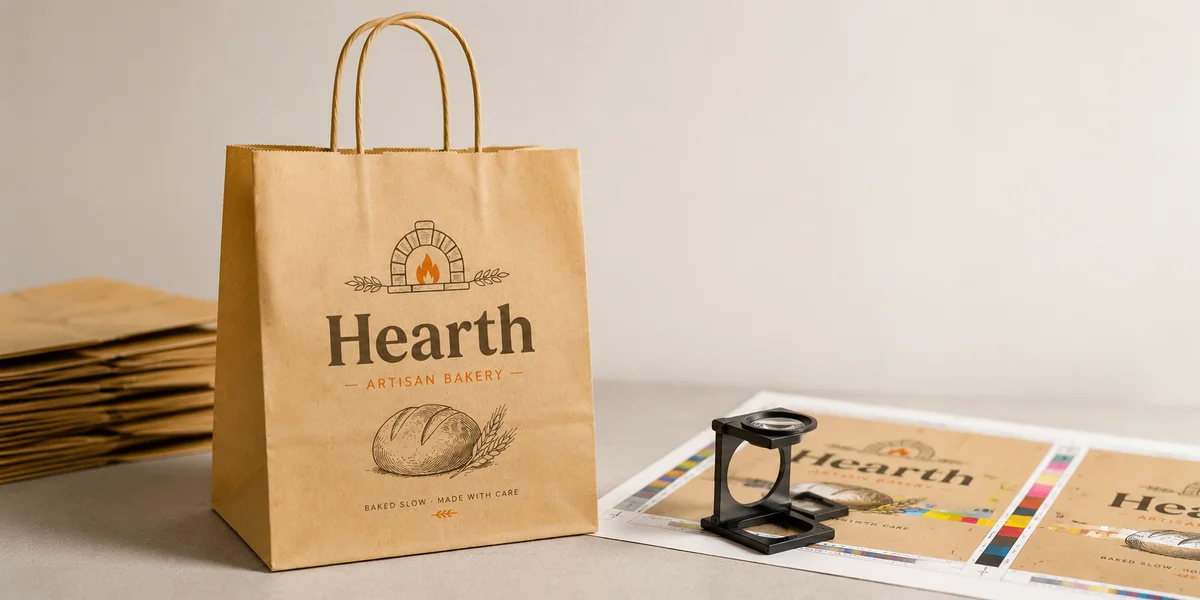
Check 1: File format and resolution. UK paper bag printers accept Adobe Illustrator (AI), Adobe PDF, and Photoshop (PSD) as primary file formats. InDesign package exports are also common, but AI or PDF with embedded links is the safest choice. All raster elements must be a minimum of 300 DPI at final output size — 150 DPI may look acceptable on screen but will produce a visibly soft print on kraft paper, which has a rougher surface than coated stock. Vector artwork is strongly preferred for logos, text, and line elements because it scales to any size without resolution loss. Avoid placing JPEG files into an otherwise vector document; JPEG compression artefacts become visible after the flexographic print process, especially on solid colour areas. If your brand assets exist only as low-resolution web files, ask Okeypackaging's free design service to rebuild them as print-ready vectors.
Check 2: Bleed and trim marks. Every printed paper bag requires a minimum3 mmbleed on all sides — the area of artwork that extends beyond the final cut line to ensure there are no unprinted edges after trimming. For bags with print that wraps around the gusset or bottom fold, extend the bleed to5 mmat fold lines to account for paper shift during the printing and folding process. Include clearly visible trim marks (crop marks) at each corner of the final artwork, set to 0.25pt stroke weight with a3 mm offset from the trim edge. Do not place critical text or logos within5 mmof any trim or fold line —flexographic presses register within approximately1 mmtolerance, and content too close to the edge risks being cropped or folded under. The safe zone, or quiet area, is the area inside the trim line by at least5 mm.
Check 3: Colour mode and matching. All artwork must be supplied inCMYKcolour mode, notRGB.RGBfiles submitted to aCMYKprint process undergo an automatic colour conversion by the prepress system, which typically produces a 15-30% shift in saturation — brand greens turn olive, reds turn brick, and blues turn grey. If precise colour accuracy is critical for your brand — for example, matching a specificPantonereference used on your signage, menus, or website — specify thePantoneMatching System (PMS) colour as a spot colour in your artwork.Pantonespot colours achieve a closer match because the ink is mixed to a specific formula rather than simulated from four process colours. The cost premium for spot colour printing on paper bags is approximately 15-25% overCMYKprocess, and it requires an additional setup charge of 40-80 GBP per spot colour for plate creation. For most UK cafe and takeaway operators, well-calibratedCMYKprocess printing on kraft or white paper provides acceptable colour fidelity at a lower total cost.
Check 4: The proofing process. After you submit your artwork, the printer generates adigital proof — a PDF representation of how the final print should appear, including correct colours, content placement, and any special instructions. This is the most critical review point in the entire production cycle. Review thedigital proof on a calibrated monitor at 100% zoom. Check every line of text for spelling errors, correct phone numbers, website URLs, and social media handles. Verify that the VAT number, registered address, or any legal copy is accurate and placed within the safe zone. Confirm that the bag size dimensions printed on the proof match your order specification — a common error is approving artwork that was designed for a different bag dimension. Once you approve thedigital proof, any errors discovered in the final printed bags become your liability, not the printer's. Okeypackaging provides a freedigital proof within 24-48 hours of artwork submission and includes a detailed checklist with each proof to guide your review.
Check 5: Bag size, handle type, and print placement. Paper bag dimensions are specified as width x depth x height (gusset), such as 250 x 120 x320 mmfor a standard lunch bag or 320 x 160 x400 mmfor a large retail carrier. The bag size determines the print placement zone — most UK paper bag printers print on the front face only as standard, with full-face and back-face printing available at 20-40% additional print cost. Handle options include twisted paper handles (most common for retail), flat paper handles (economy, fits within the bag profile), die-cut handles (cut directly from the bag material, no separate handle), and ribbon or cord handles (premium, typically for boutique or hospitality use). The handle type affects artwork placement because the handle reinforcement patch or die-cut area occupies space on the bag face that cannot carry print. Provide your artwork to the correct size template rather than designing freehand and expecting the printer to adapt.
Check 6: Common artwork mistakes. UK packaging printers report that approximately 30% of first-time artwork submissions require revision. The most common issues include: missing bleed (22% of rejections),RGBcolour mode (18%), low-resolution images below 300 DPI (15%), text that has not been outlined or converted to paths (12%), content placed outside the safe zone (10%), and incorrect file format — such as submitting a Word document or Canva PDF without embedded fonts (8%). Canva exports are a persistent source of issues because the platform exportsRGBPDFs by default, and the embedded fonts are often subset rather than fully embedded, causing RIP errors. If you are using Canva for your artwork, export as PDF Print with crop marks and bleed enabled, then open the resulting file in Adobe Acrobat and check that all fonts are embedded via the Preflight tool. Better yet, use Okeypackaging's free design service to convert your Canva design into a print-ready file.
Check 7: Minimum order quantity implications for artwork. Your MOQ determines the cost allocation for print setup, and therefore the per-unit artwork cost. At 500 units, the setup cost of 40-80 GBP per colour is spread across only 500 bags, adding 8-16p per bag in setup alone before the unit print cost. At 5,000 units, the same setup cost adds just 0.8-1.6p per bag. Multi-colour designs compound this effect — a three-colour design at 500 units carries a setup cost of 120-240 GBP, or 24-48p per bag. For small-batch custom orders, limiting your colour count to one or two colours significantly reduces the per-unit cost. Okeypackaging offers custom-printed paper bags from 500 units per design, with free artwork setup on single-colour designs and 40 GBP per additional colour. Browse the paper bags product page for size and stock options, or visit the quote page to calculate the per-unit cost at your target volume.
Check 8: Paper stock, finish, and their effect on print appearance. Kraft paper absorbs more ink than white or coated paper, producing a warmer, less crisp print appearance — colours appear approximately 15-20% darker and less saturated than on the screen proof. White paper or coated paper produces a truer colour reproduction because the substrate does not compete with the ink. If your brand uses pastel colours, fine typography, or photographic imagery, specify white paper rather than kraft. The paper weight, measured in grams per square metre (GSM), also affects print quality — 70-80 GSMis standard for lightweight carrier bags, while 100-120 GSMprovides a stiffer, more premium feel and absorbs ink more consistently. Request a paper stock swatch from your supplier before finalising artwork, because the sameCMYKfile prints differently on kraft versus white, and on70 GSMversus120 GSM. Contact Okeypackaging's design team via the design services page for a stock swatch pack and dimensioned artwork template.